How to Print a Photo
Printing paper is expensive..and we are not Walgreens. You are NOT free to print as many photos as you please. And you are not free to print photos that are not for class. Please refrain from printing beyond the criteria for class.
For majority of photo printing in here, you will print either-
ONE 8x10 photo (full page)
or
TWO 5x7 photos (2 per page)
*When printing 5x7, BOTH photos should print at the SAME time in order to save paper (otherwise, if you print separately, the photos use only half two different papers!
but...
The only exception to this would be odd shape photos, such as a square photo or panoramic photo.
BEFORE YOU PRINT ANYTHING:
In photoshop check the following...
1. Levels!
-click the levels icon
- make sure that the black arrow and white arrow are touch the edges of your "mountain range" (known as the histogram) in the properties window.
-use the midtones (middle arrow) to adjust your midtone values
*Using Brightness and contrast for trying to lighten a photo tends to make the photo too bright and too dark! Not a good choice!
2. Color Corrections- is it blue? orange? are your whites not white?
-use the options given out for the color correcting assignment (here) for information on how to fix this!
3. TEST PRINT BEFORE THE REAL PAPER IS PUT IN THE PRINTER!
PLEEEEAAAASE don't assume it will be okay to print becuase it looks okay on the computer screen! It is NOT! We are test printing for a reason! Do it! Photo paper is super expensive!
TODAY'S PRINT:
Look through your photos and decide which two to four (depends on what size you want to print) photos you would like to print for today. These photos should something taken for class from assignment #15-22.
Here's how you will chose the # of prints:
You have 2 pages to print...that works in one of these 3 possibilities...
1. 2 8x10 (two full page) photos
2. 1 8x10 (full page) and 2 5x7's (2 photos on one page)
3. 4 5x7's (2 photos per page)
*You should ALWAYS print 5x7's together to use the page fully! Printing them one at a time wastes half a page!!!
How to do this:
(If printing full size photo, skip to step 3 and skip #5)
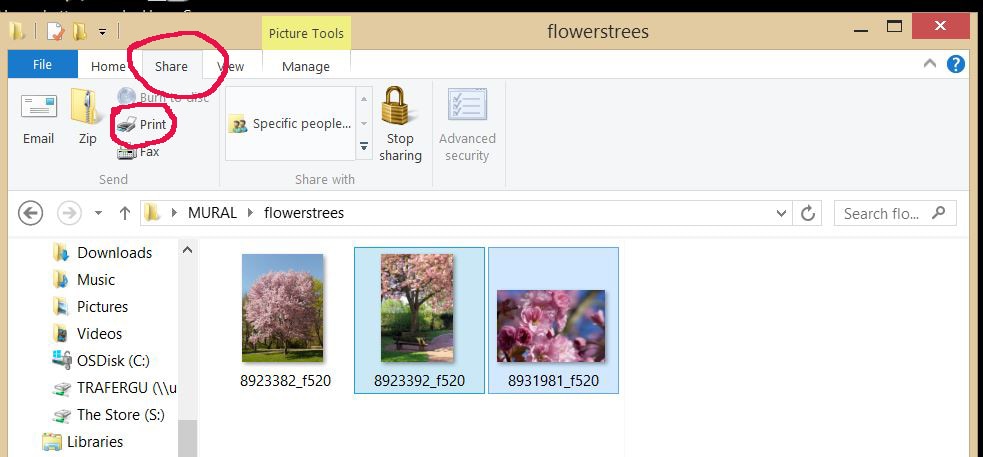
2. While you have the folder open to these files, highlight both photos
*If the files are in two separate folders, you need to move one so that you are able to print together!* (maybe copy them to a "printing" file)
3. Click the "share" tab at the top of the top of the screen.
4. Click print
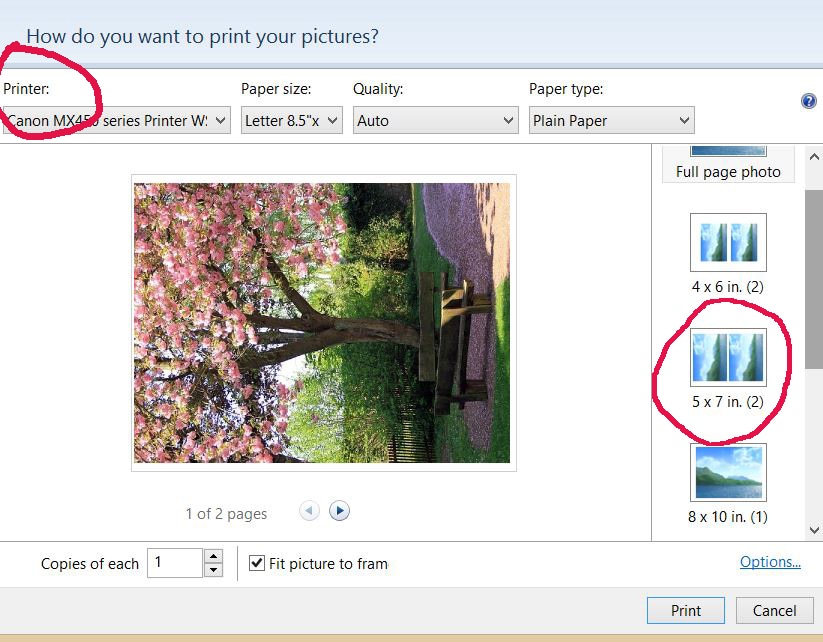
5. A screen will pop up. It will automatically choose full page printing. On the right side, choose 5x7 option. This should show you both photos on a single page to print.
*Do NOT change the paper size at the top. Our paper size is NOT changing; the picture size is changing to fit two photos in a single page!*
**If a picture appears cut off, it may be because the computer defaults to "fit the picture to the frame"...so you can uncheck that box on the bottom, and it will reset to its original size**
6. Click on the printer options in the top right and choose Rm286HPC (not HPL...that one is a black and white printer)
7. Click Print and go to the printer room.
*8. Wait for the previous person's print to end. Allow the printer to reset- a Red bar will appear... click the OK button TWO times... then your photo page will print out.
9. Cut the prints apart neatly- you can use the paper cutter. You can choose to leave a white border or cut it away.
10. Use a sharpie to write your name and class period on the back of all photos.
11. Choose one to leave out to critique and display. The other photo(s) can go in your folder.
12. Continue on with your assignments that are due...Get caught up! Check Canvas to make sure all assignments are turned in
|
|
